A hexafoil is a geometric design created by overlapping circles. The prefix ‘hexa’ means six, implying six overlapping circles, though many designs found in architecture and art contain more than six circles.
If you would like to learn more about hexafoils and their uses, follow the “More About Hexafoils” links included at the bottom of this page.
These instructions are for creating a chainmail hexafoil based on the helm chain pattern. This design is sometimes referred to as a helm chain flower or just a helm flower.
Materials
To make this hexafoil, you need:
Two small-nosed pliers
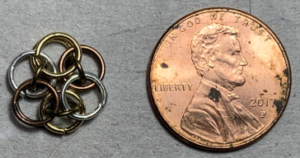
9 jump rings, 6mm outer diameter (OD), 21 gauge (I used 3 gold, 3 silver, and 3 copper. You can use all the same color, if you wish.)
3 jump rings, 4mm OD, 21 gauge (I used brass.)
These are ‘standard’ jump rings available at hobby stores, in the jewelry findings section. If you get ‘heavy’ gauge jump rings, you will need to get larger rings. If the OD of the heavy gauge jump ring is 6mm, the inner diameter will be smaller and you will have a difficult time fitting the rings through.
If you want to attach your hexafoil to something, you will need additional jump rings.
Tips
If you have never done chainmail before, this is not the easiest pattern to start with. (It is rather small!) Check out some of the intro-level instructions here if you’d like to start with something easier.
This is NOT a neat and tidy ring.
Make sure you close all of your rings neatly before you get started.
Yes, you will be opening some back up, but making them tidy to start with will save you some aggravation when you don’t want to put your piece down to close a ring before you use it.
This is a neat and tidy ring.
When you open a ring, one side is ‘up’ and the other side is ‘down’. Sometimes it is easier to weave a ring through a hoop if the ‘up’ and ‘down’ sides are reversed, so if you are having difficulty getting a ring through another ring, try opening it the opposite way.
Getting Started
Lay out your rings.
3 gold 6mm rings
3 silver 6mm rings
3 copper 6mm rings
3 brass 4mm rings
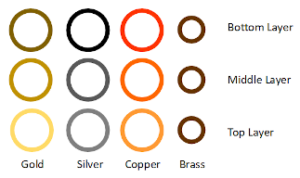
This pattern has three layers. The graphics have different shades to represent the layers, with the darkest shade being the bottom layer and the lightest shade being the top layer.
I lay out my rings in the pattern I am going to make.
This is not required, but when I am doing a pattern for the first time, I find it helpful.
Step 1
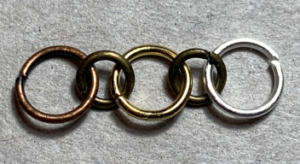
Start by linking two 6mm jump rings together (pictured are gold and silver) with a 4mm jump ring (pictured is brass).
Then, use another 4mm jump ring to add a third 6mm ring. (If you are using my color scheme, the third ring is copper.)
Step 2
You now have a chain of three 6mm jump rings held together with two 4mm jump rings.
My chain is copper-brass-gold-brass-silver. As you follow the instructions below, it doesn’t really matter which color ring you add first or second, etc., so long as you put the ring in the correct position.
Step 3
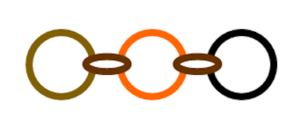
Lay your chain flat.
Next, you are going to use a 4mm jump ring to connect your first and last 6mm ring.
It is VERY important that your rings are all oriented the same way. If your chain gets twisted, you will not be able to add the middle and top layers properly.
Step 4
Make sure your 6mm jump rings are able to lay flat after you’ve added the third 4mm ring.
Step 5
Place a copper ring OVER (not through) the 4mm ring that is opposite to the copper ring on the first layer. At this point, it isn’t attached to anything. It is just loose on top of the ring.
(You may find it easier to hold your rings, rather than laying them flat. I do, but I had to lay them down to take pictures.)
Step 6
Open a 6mm gold ring. (NOT the one already being used!)
While holding your loose copper ring over the brass ring, weave the open gold ring through the brass ring that is inside the copper ring.
Step 7
Close the gold ring.
Step 8
Now you are going to do the same thing again, but with different color rings…
In my picture, I’ve placed a gold 6mm ring over the brass 4mm ring opposite the gold ring I just placed. (In other words, the single gold ring in the middle layer is opposite the gold ring pair-top and bottom layer.)
Step 9
Open one of your 6mm silver rings (that isn’t already being used!) and weave it through the brass ring that is inside the gold ring AND weave it through the brass ring that is inside the copper ring (from the previous step). Close the silver ring.
(This is one of those places that you just can’t seem to get the ring to weave through, try opening the ring the opposite way.)
Step 10
At this point, your hexafoil should look like this.
The bottom layer has three 6mm rings: copper, gold, and silver. The middle layer has two 6mm: copper and gold. The top layer has two 6mm rings: gold and silver.
Step 11
Open an unused 6mm silver ring. Weave it AROUND the brass ring (that doesn’t have a middle-layer 6mm ring around it yet) and UNDER the gold ring in your TOP layer. Close the silver ring.
Step 12
Open a 6mm copper ring (that isn’t already being used!) and weave it through the brass ring inside the silver ring AND the brass ring inside the gold ring. (If you have difficulty getting the copper ring through both, try opening the ring the opposite way.)
Step 13
Find the first ring you attached to the top layer. (If you are using colors like mine, it is gold.) It is through the brass ring inside the middle-layer copper ring. You need to carefully open the gold ring, keep it inside the brass ring inside the copper ring, and weave it through the brass ring inside the silver ring.
Ta-da!
Your hexafoil is complete!
How to Attach your Helm Flower
I added a 4mm brass ring (around my top layer and bottom layer gold rings) with a 6mm silver ring to my hexafoil, so I could attach it to things…
…such as my work ID badge holder.
You could also attach it to a bail and then hang it on a necklace.
What to learn more about Hexafoils?
Here are some blogs with more information about hexafoils: